Why use a rack for herbs?
Summer herbs can arrive faster than you can cook with them. Drying a small harvest is one way to keep some for later, and a shallow rack makes the process easy to watch. Unlike a thick bundle, leaves spread across mesh have room for air to move around them. A rack also gives you a dedicated place for herbs without taking over the kitchen counter.
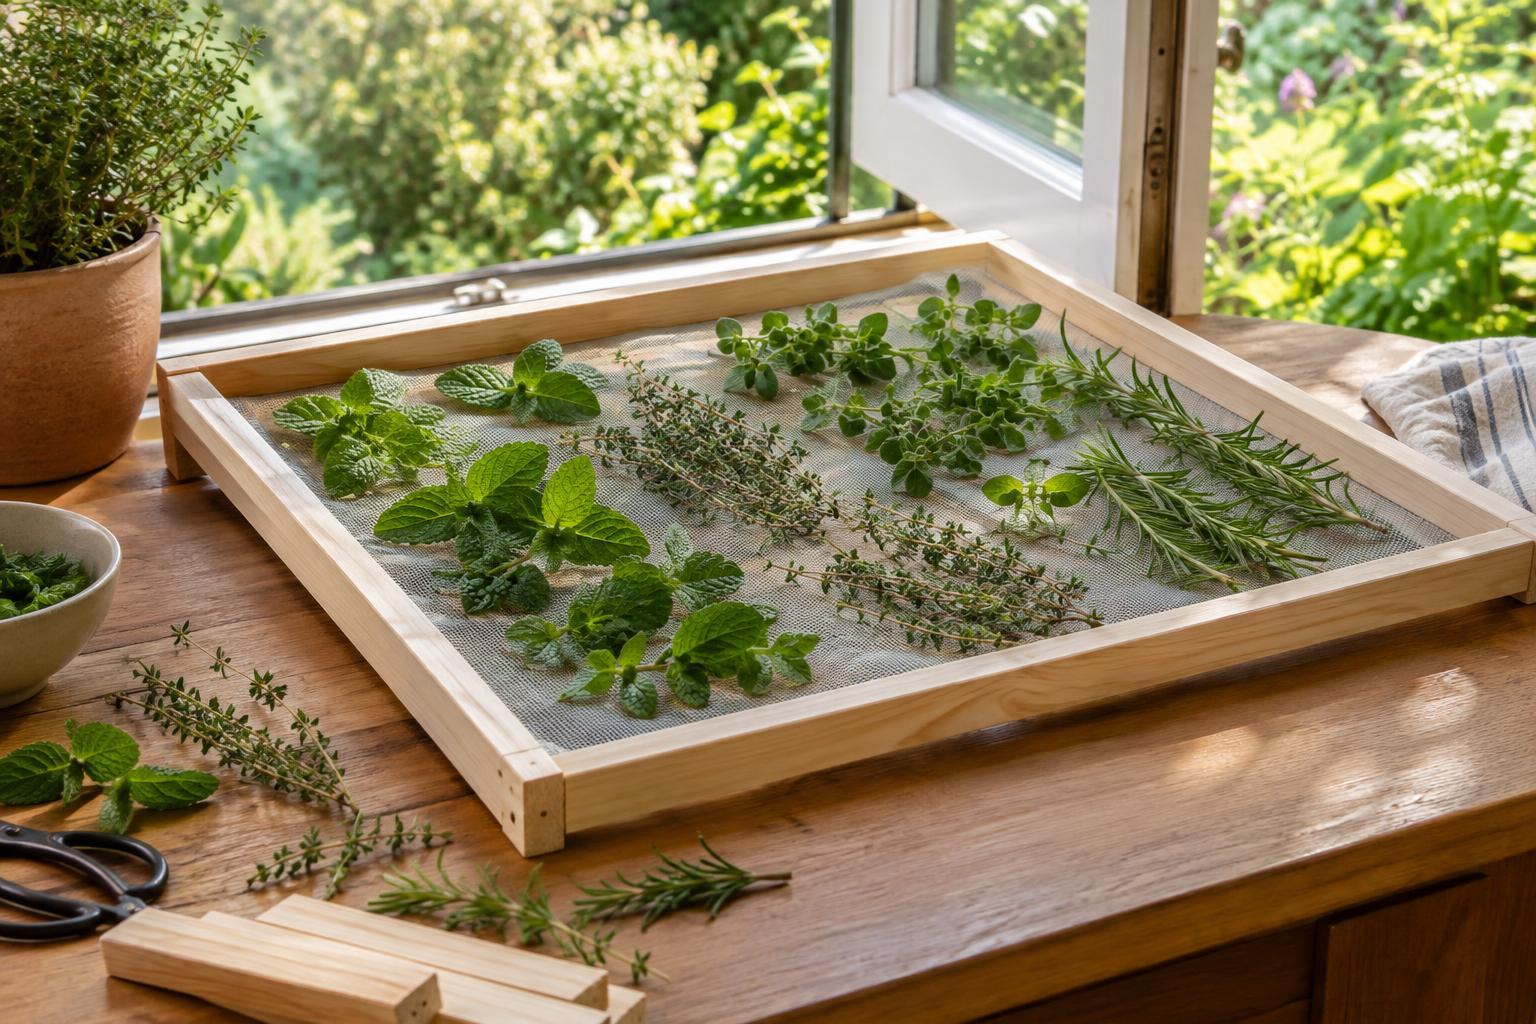
This design is a single, raised tray rather than a hanging stack. It is a good fit for a modest harvest and can sit on a stable shelf or table. You can make more than one if you regularly cut several kinds of herbs, but leave space around each rack for airflow.
Gather materials and build the frame
For a rack roughly 30 by 40 centimetres, gather four strips of untreated timber, four matching wooden blocks for feet, wood screws, and a piece of clean, breathable cotton mesh suitable for contact with food. You will also need a saw if the timber is not cut to size, sandpaper, a drill, a stapler and scissors. Choose mesh with openings small enough to support individual leaves. Avoid coated or scented materials, and wash and thoroughly dry washable mesh before assembly.
Arrange the timber in a rectangle and cut the pieces to fit. Drill pilot holes, then screw the corners together. Sand rough edges and check that the frame sits square. Attach one wooden block beneath each corner to lift the tray a few centimetres above its surface. Set it on a flat table to check that all four feet make contact; adjust any uneven block before adding the mesh.
Pull the mesh across the top of the frame so it is taut but not stretched out of shape. Fold its edges over the outside of the timber and staple them to the outer faces, keeping staples away from the area where the herbs will sit. Trim excess fabric. Brush away sawdust and check for loose staples, splinters or sharp screw ends before using the rack.
Prepare and arrange the harvest
Pick herbs that look healthy and remove damaged leaves. Shake off loose soil and inspect the stems for insects. If the herbs need washing, rinse them gently and let surface water dry completely before placing them on the rack. A salad spinner used gently, followed by time on a clean towel, can help with leafy stems. Starting with wet herbs makes it harder to dry them evenly.
Strip large leaves from thick stems if you prefer, or lay small sprigs on the mesh. Keep everything in a loose single layer rather than piling it up. Separate varieties so you can remove each when it is ready. Herbs with softer, thinner leaves may dry differently from sturdy-leaved ones, so a little extra space and a label beside the rack can save guesswork later.
Find the right place and check progress
Put the rack somewhere clean, dry and well ventilated, away from direct sun, cooking steam and splashes. Bright sunlight can be hard on delicate leaves, while a damp corner slows drying. A spare room shelf may work better than a busy kitchen. Keep the rack beyond the reach of pets and away from open windows where dust or rain might reach it.
Check the herbs regularly, moving or turning thicker sprigs if their undersides still feel soft. Drying time varies with the herb, the size of the leaves and the room conditions, so use touch rather than a calendar. Leaves should feel crisp and crumble readily; stems should be dry rather than pliable. If you notice a musty smell or visible mould, discard the affected herbs. Do not pack leaves away while they still feel cool or damp.
Store the herbs and care for the rack
Once the herbs are fully dry, lift them off the mesh with clean, dry hands. Store them in clean, dry, airtight containers out of heat and direct light. Keeping leaves fairly whole until you use them can make them easier to identify and less messy to handle. Label each container with the herb name so similar-looking leaves do not become a puzzle.
After each batch, brush plant fragments from the rack and clean the mesh as its material allows. Let it dry fully before storing it or adding another harvest. If the mesh tears or becomes difficult to clean, remove the staples and replace it. That small repair keeps the timber frame useful through many summer harvests.